Imagine an application which requires 24×7 availability with maximum 15 minutes of downtime allowed. How would you ensure the database hosted on your Elastic Block Store (EBS) volume is backed up to meet the required SLAs?
An automated backup is the key process here. Automated backups work in the background and don’t require manual intervention. When you want to backup the data, Amazon Web Service Application Program Interface (AWS API) and Command Line Interface (AWS CLI) both play major roles in the automation process, letting you write automated scripts.
In this article, we will discuss why timely snapshots are so important for data recovery. Also, we will show you how to automate the backup of EBS volumes using AWS CLI.
An Automated Backup Use Case: e-commerce Website
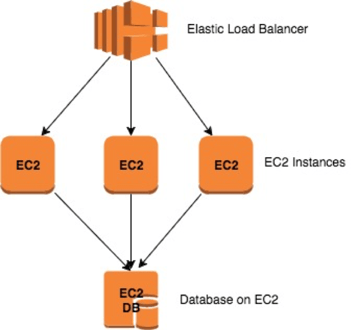
Consider a use case of a highly available infrastructure deployed on the public cloud, such as an e-commerce website. The website runs 24×7 on an highly available infrastructure. The application cannot afford downtime. For this application to run, the following setup is required:
- A load balancer and multiple EC2 instances behind Elastic Load Balancing
- EC2 instances hosting a NodeJS-based application that connects to a single DB instance which is also hosted on an EC2
- A MySQL database which is updated almost every five minutes with new transactions on the system
Even if one of the application’s servers goes down, AWS Auto Scaling can launch new instances immediately. But if the MySQL database server goes down, the whole system might go down as well, and the data loss would be an additional problem.
This is a perfect case in which automating the backup of the database instance would prevent the loss of data. ![]() Automated backups make sure you are prepared for any kind of threats, including Disaster Recovery.
Automated backups make sure you are prepared for any kind of threats, including Disaster Recovery.
For the recovery of an application, recovery time objective (RTO) and recovery point objective (RPO) are two very significant parameters.
The recovery time objective (RTO) is the maximum outage that is allowed on your application. For applications with zero RTO, the SLA is zero downtime. Practically, this is a very tough situation, but to achieve even 99% of that result, the redundant copies of data and the highly available infrastructure must be able to guarantee almost zero downtime.
The recovery point objective (RPO) indicates the amount of data that will be lost in the event of a system failure.
For example, say there is an application set up to take EBS snapshots every four hours, and then that system goes down. The data stored in the EBS volume since its last backup is not recoverable in this case. The RPO in this case is four hours.
The RPO and RTO are inversely proportional to the money spent on your infrastructure. If your RPO and RTO are low, you have to ensure that you have an appropriate backup and data recovery strategy in place.

The architecture diagram above shows the highly available architecture of an e-commerce website like the one described above. The website owners must have a plan in place in case they need to recover their database from a disaster.
One of the best ways to do this is to prepare a timely backup of the EBS of the EC2 instance to which that EBS is connected. The EBS snapshot is stored on Amazon Simple Storage Service (S3) and can be used later to recover the database instance.
![]() Below, we’ll explain how to take these snapshots automatically and protect your EBS volumes. To take EC2 Snapshots, the user or program need to have access to the AWS resources. The best way to do this is to create a small EC2 instance on which the script will run in the background.
Below, we’ll explain how to take these snapshots automatically and protect your EBS volumes. To take EC2 Snapshots, the user or program need to have access to the AWS resources. The best way to do this is to create a small EC2 instance on which the script will run in the background.
This EC2 instance should have enough access to take the snapshots. An identity and access management (IAM) role must be created and the policy to create snapshots must be attached to this role: an EC2 full-access role is sufficient to create snapshots.
How to Take Snapshots of EBS Volumes Tagged “Production”
Here is an example of how to use AWS CLI to take a snapshot of an EBS volume.
The backup is taken by filtering for any volume tagged “Production.” In this example, we will find the volumes with that tag, the instance associated with those volumes, and the block of the volume that is attached to the instance. Then we will create a snapshot of the volume with the description and the instance name.
1. Tag Your EBS Instances

The EBS backups will be taken using AWS CLI. The scripts can be written in any programming language (such as like Bash or Python) to take the backup of the instance.
The key is to identify which instances are going to be backed up. For that, tagging is used.
Tagging is very useful in a situation where you have hundreds of instances running. Tagging lets you appropriate unique tags for resources. For example, out of 30 instances, ten of them can be tagged “Production,” ten more tagged “UAT,” and the remaining ten tagged “QA.”
In this situation, EBS snapshots of the ten instances tagged “Production” can easily be taken.
2. Creating Snapshot Permissions
To take EC2 Snapshots, the EC2 instance should be provided access to communicate with the AWS resources. The best way to do this is to create a small EC2 instance on which the script will run in the background.
This EC2 instance should have enough access to take the snapshots. An identity and access management (IAM) role must be created and the policy to create snapshots must be attached to this role: an EC2 full-access role is sufficient to create the snapshots.
Let us suppose the RTO is 15 minutes. We then have to ensure the backup strategy by taking a snapshot of the database every 15 minutes. We have to create an automated backup script and run it every 15 minutes.
3. Scripting
Now that you have access to the resource, you can create a script which will take automated backups at a defined frequency. The below script is written in Bash. It works as follows:
- First, it finds the list of volumes with the tag “Production.”
volume_id=$(/usr/local/bin/aws ec2 describe-volumes –filters “Name=attachment.status, Values=attached” “Name=tag:Environment,Values=Production” –query ‘Volumes[].Attachments[].VolumeId’ –output text –region us-west-2 )
- Then, the list is iterated and the instance name to which the volume is attached is found.
instance_id=$(/usr/local/bin/aws ec2 describe-volumes –volume-ids $volume_id –query ‘Volumes[].Attachments[].InstanceId’ –output text –region us-west-2 )
- Next, it finds the name tag of the instance.
inst_name=$(/usr/local/bin/aws ec2 describe-tags –filters “Name=resource-id,Values=$instance_id” “Name=key,Values=Name” –query ‘Tags[].Value’ –output text –region us-west-2 )
- It finds the device block of the volume whose snapshot is to be taken.
block=$(/usr/local/bin/aws ec2 describe-volumes –volume-ids $volume_id –query ‘Volumes[].Attachments[].Device’ –output text –region us-west-2)
- It then creates the snapshot of the volume with the description of the instance name:
snapid=$(/usr/local/bin/aws ec2 create-snapshot –volume-id $volume_id –query ‘SnapshotId’ –description “New Automated-SnapShot-$inst_name-$block-$DATE” –output text –region us-west-2 )
- You should now have your snapshot.

The script can be found here: https://drive.google.com/open?id=0B_i6vDoecuJ9em45OE5BWkFHVjQ
4. Automating the Backup
Now that the script is prepared, we want to run it automatically every 15 minutes.
To make this happen, we will create an entry in crontab. The entry can be made using the following commands:
- Save the above script as backupscript.sh.
- Make this script executable by running chmod a+x backupscript.sh
- Make the entry in crontab by running “sudo crontab -e”
- Add entry “*/15 * * * * ./backupscript.sh”
- Save the file and exit
This will now run the script every 15 minutes and the snapshot will be created on a regular basis.
Conclusion
If there is one thing that readers need to get out from this article, it is the understanding of the nature of unpredictability – The knowledge that there will always be things that are beyond our control.
That is the nature of the world, and this is why, for example, when you travel or buy a house or basically have anything of value that you hold dear – you will try to insure its existence in any way possible.
And, this is even more important, when it comes to information: every loss of information equals loss of money. Automation will not prevent this, but it is a key in preventing that data loss. It is always advisable to set up a scheduled, automated backup.
Although it’s important to remember that automation does not negate the need for ongoing check-ups of the system, it will help for backup and restore, as well as improved durability.
