After the third time setting up a server with these technologies, I started to get annoyed with having to remember all the different steps to get everything working together. I really enjoy this combination of technologies and I want to aggregate all the steps into a single page.
Visit the Amazon EC2 website. Sign up if needed then navigate to the main EC2 page. Click “Instances” on the left and then “Launch Instance”.
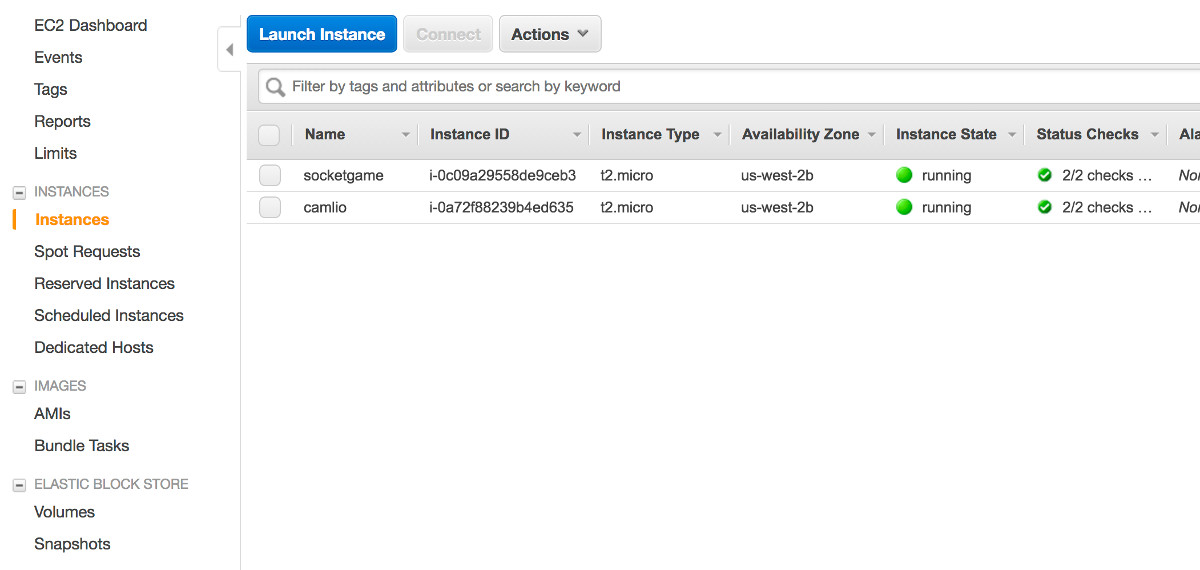
You’ll then be shown a list of server images you can select from. I always just go with the Ubuntu Server 16.04. Then you’ll be prompted for an Instance Type, with the free t2.micro type already selected. If you don’t mind paying, you can select a better type at this point. Then click “Review and Launch” then “Launch” on the following page.
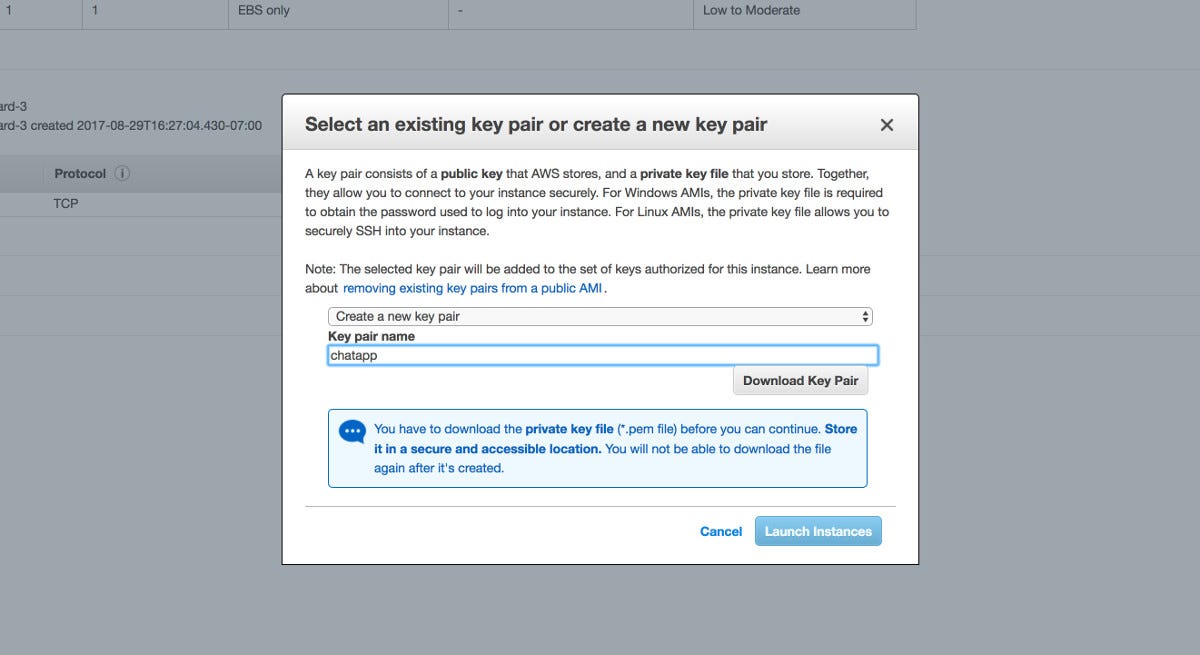
Now you’ll create a key pair that will allow you to connect to your server via SSH, which we’ll do in a bit. Select “Create a new key pair” then name it. Download the key file and save it somewhere safe. As the Amazon warning states, you won’t be able to download the file again. Then click “Launch Instances”.
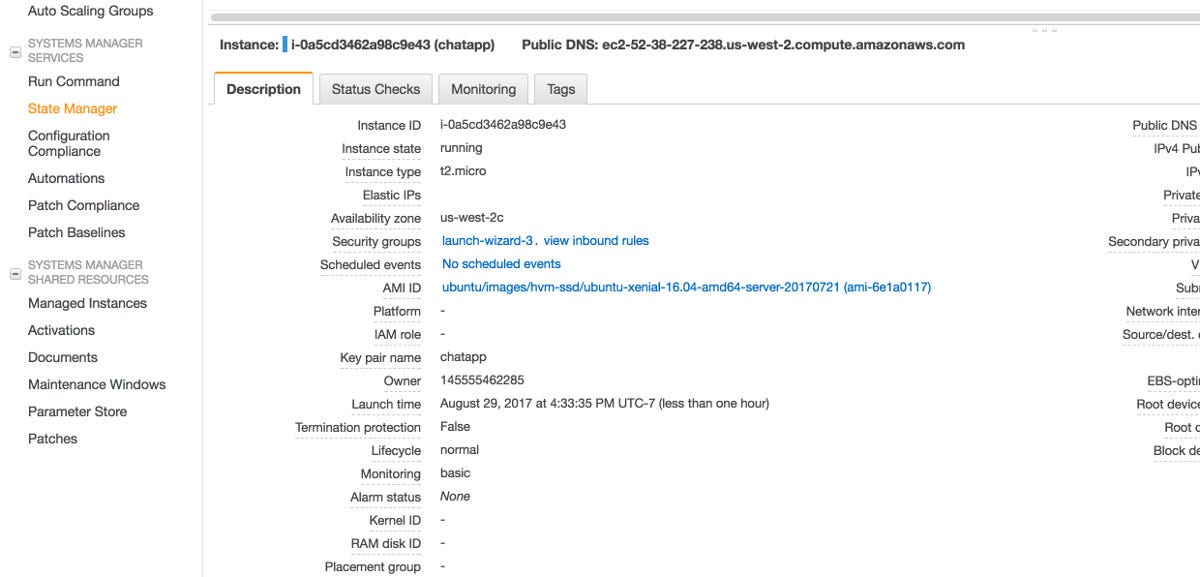
Back at the main EC2 page, you’ll now see your new Instance when you click “Instances” again. You can name it by clicking the pencil under the “Name” column. With your instance selected, a “Description” pane will show you more details. Click the link next to “Security groups”, which is named “launch-wizard-3” for me here.
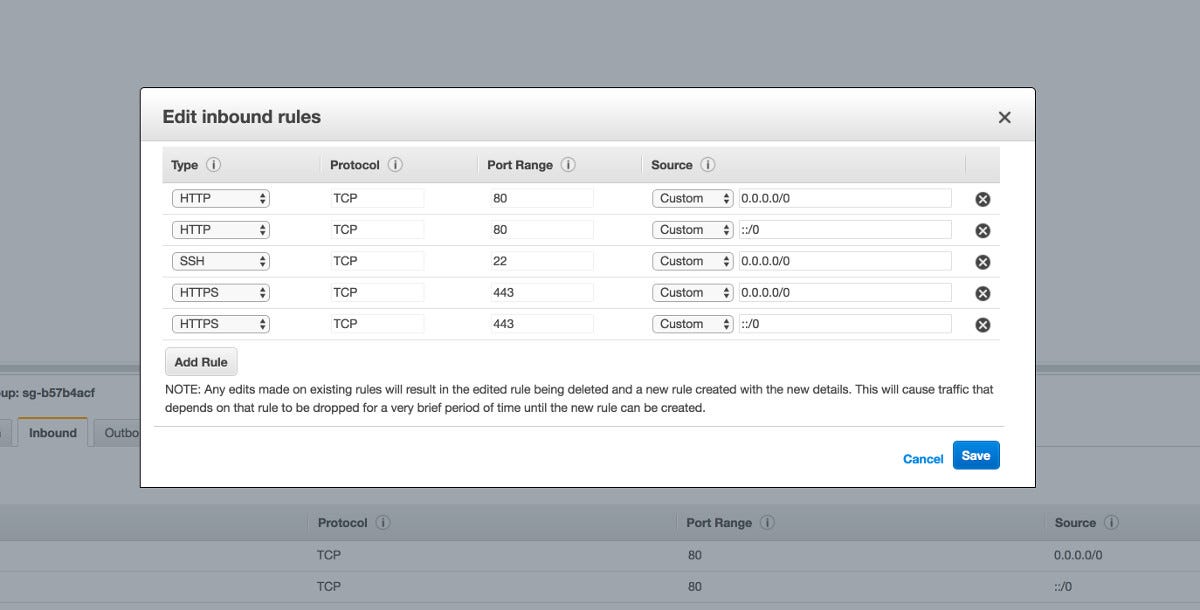
Here we’ll need to set up our HTTP and HTTPS protocols because only SSH is enabled by default. In the bottom pane, click the “Inbound” tab then click “Edit”. Click “Add Rule” with “Type” set to “HTTP” and “Source” set to “Anywhere”. Then repeat this with “HTTPS” instead of “HTTP” and save.
Now we’ll setup an Elastic IP for this instance. On the left pane of the main EC2 page, click “Elastic IPs” then “Allocate new address”. Once you create that IP then navigate back to the main “Elastic IPs” page, select that new IP then click “Actions” then “Associate address”.
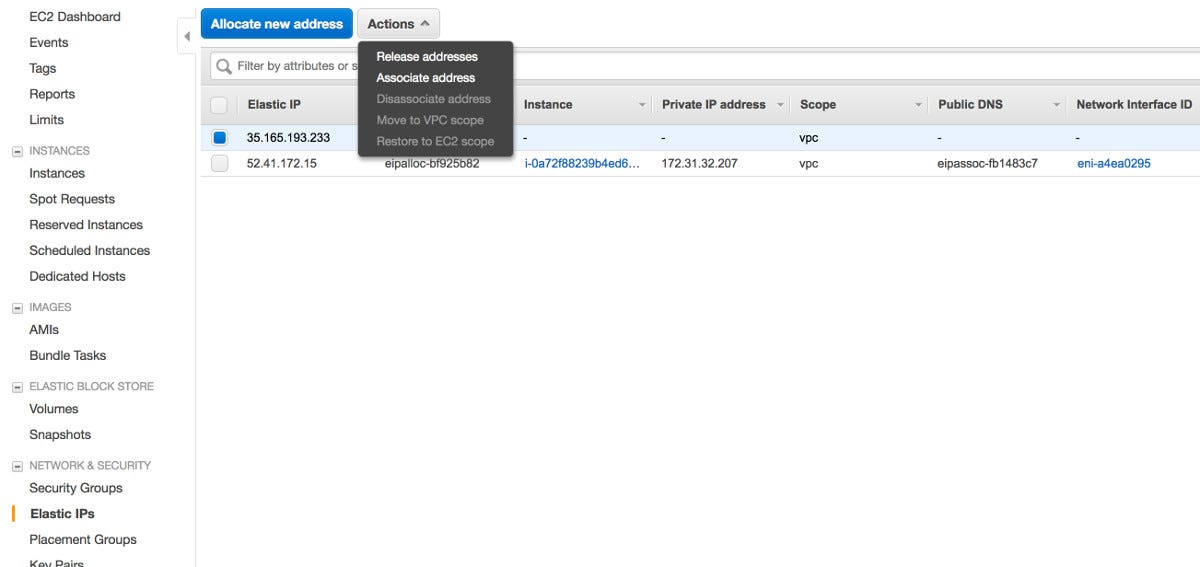
You’ll select your instance and private instance IP then make the association. When you go back to “Instances”, the “Description” pane will show your new IP address next to “IPv4 Public IP”. Copy this IP address somewhere.
One more thing on Amazon we need to do. Let’s setup a Hosted Zone through Amazon Route 53 to get Name Servers for our domain that point to our new IP address. At the top left of any Amazon Web Services page, there should be a “Services” tab. You can click that and go to “Route 53” from there.
Click “Hosted zones” on the left pane, then click “Create Hosted Zone”. Enter your domain then click “Create”. You’ll be navigated here:
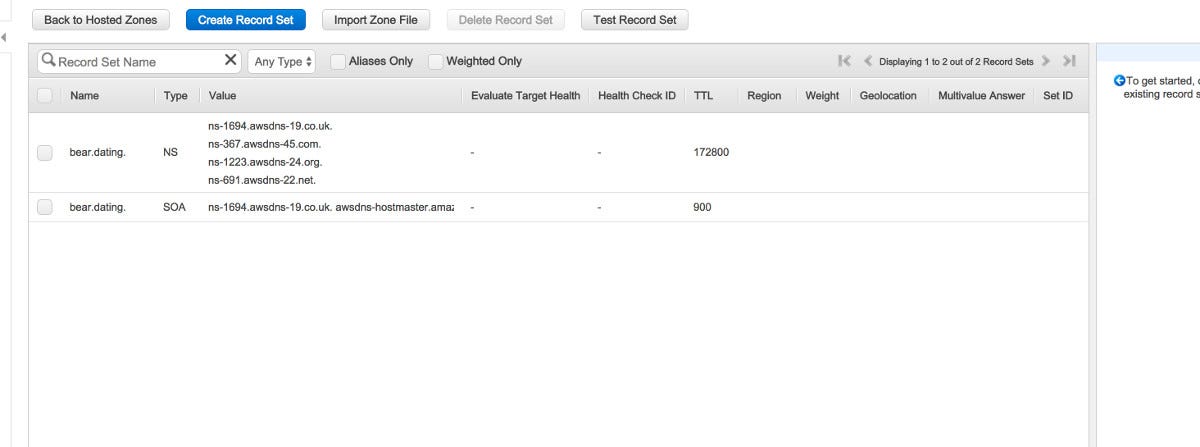
Click “Create Record Set”. Leave the “Name” field blank and put your Elastic IP in the “Value” field, then click “Create”. Click “Create Record Set” again and now put “www” in the “Name” field. Put your IP in the “Value” field again and click “Create”.
You should have four record sets now, two of Type “A”, one “NS” and one “SOA”. The values for “NS” are your Name Servers. There should be four Name Server domains that you will now copy, excluding the period on the end of each one that Amazon adds here.
At this point, I’ll need my domain name for the NGINX config file and for when we set up Let’s Encrypt. I registered “bear.dating” back when I had the great idea to create a modern gay bear dating website. If you’ve seen the selection of current bear dating sites (I’m assuming you have), you’d also see the desperate need for a newer modern site. Well I still haven’t made that site, but I still have the domain, so I’ll just use it for this tutorial.
Direct your domain to these Name Servers on your Registrar site. I’m using Namecheap:
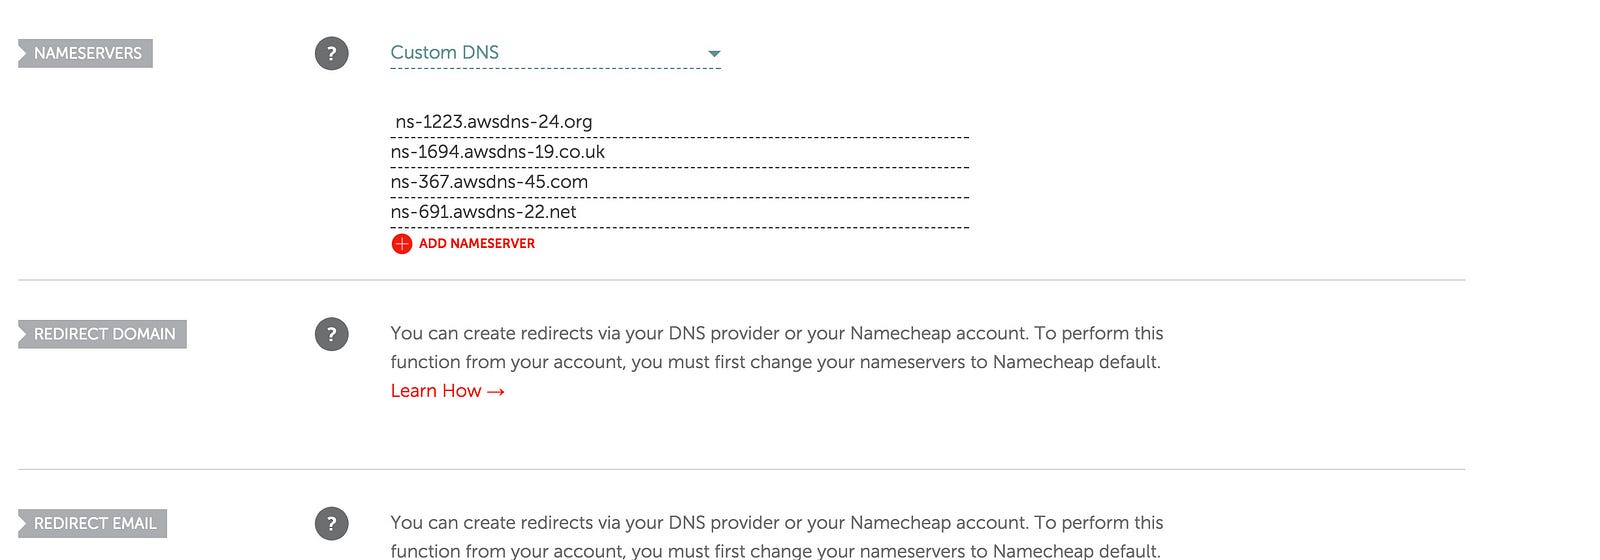
After a bit, your domain should now go to your instance.
Now let’s SSH into our new instance! I’m on a Mac, so I’ll just be using the Terminal program. If you’re on Windows, I’m not sure what the best SSH programs out there are, but it looks like Putty is a popular one.
This is where we’ll be using our .pem key file we downloaded before. But first, we need to change the permissions for that file.
chmod 400 chatapp.pem

You’ll need your IP and the location of your .pem file. You can just drag and drop the file into Terminal. You’ll run this command to connect, replacing with your own info:
ssh -i /Users/andrewharris/Documents/chatapp/chatapp.pem [email protected]

We’re in! Now I’ll essentially follow parts from this tutorial for setting up NGINX. Here’s the list of commands:
sudo wget http://nginx.org/keys/nginx_signing.key
sudo apt-key add nginx_signing.key
cd /etc/apt
sudo nano sources.list
At the bottom of that file, append it with:
#
deb http://nginx.org/packages/ubuntu xenial nginx
deb-src http://nginx.org/packages/ubuntu xenial nginx
#
Save the file then:
sudo apt-get update
sudo apt-get install nginx
Then start NGINX:
sudo service nginx start
Now navigate to your Public IP or your domain in your browser. You should see this:

Now let’s setup Let’s Encrypt. I’m using a tutorial from here. If you’re not using my exact setup with NGINX and Ubuntu 16.04, you may need to visit that site in case there’s a different setup. But for us, we’ll run this:
sudo apt-get update
sudo apt-get install software-properties-common
sudo add-apt-repository ppa:certbot/certbot
sudo apt-get update
sudo apt-get install python-certbot-nginx
Before we get our certification, we need to change a line in our NGINX config file. Open it with this:
sudo nano /etc/nginx/conf.d/default.conf
Next to “server_name”, replace “localhost” with your domain and the “www” subdomain. So for me, it looks like:
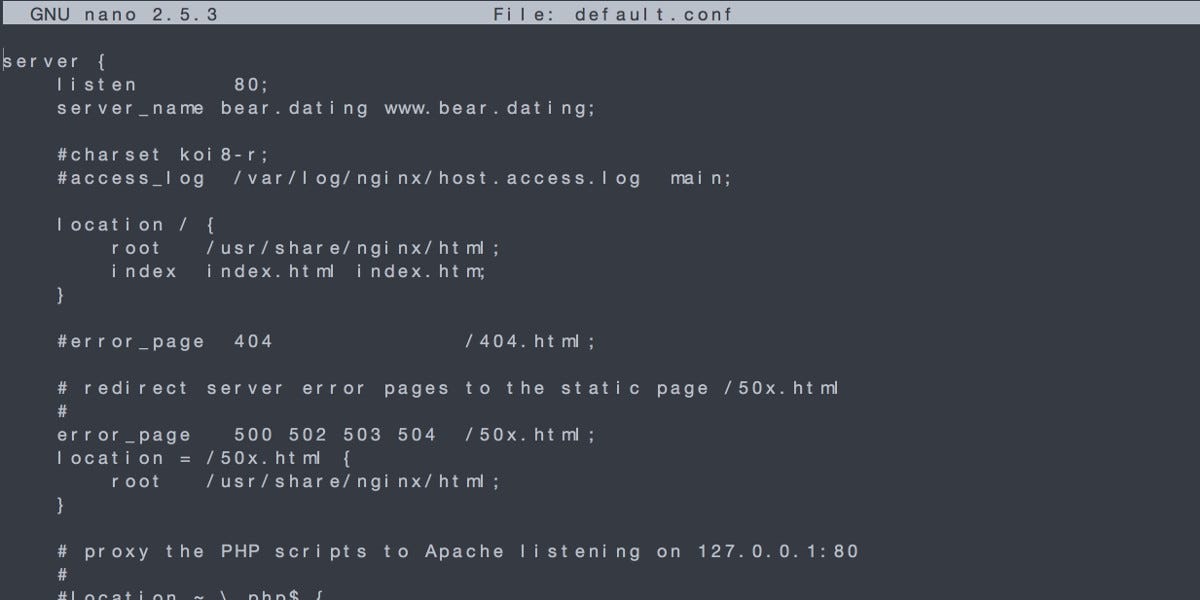
Save that file, then run this with your own domain:
sudo certbot — nginx -d bear.dating -d www.bear.dating
You should get a success message showing where your new certification files are stored. Now we need to create a new NGINX config file. Navigate here:
cd /etc/nginx/conf.d
You can “ls” to see the default file. We’ll be creating a new one, so lets rename this default one so NGINX doesn’t use it:
sudo mv default.conf default.conf.bak
Then to create and open a new one:
sudo touch server.conf
sudo nano server.conf
Now put this in your new config file and save, replacing the four instances of “bear.dating” and the two instances of “www.bear.dating” with your own domain:
#
server {
listen 80;
listen [::]:80;
server_name bear.dating www.bear.dating;
return 301 https://$server_name$request_uri;
}
server {
listen 443 ssl http2 default_server;
listen [::]:443 ssl http2 default_server;
server_name bear.dating www.bear.dating;
location / {
proxy_pass http://localhost:3000;
}
ssl_certificate /etc/letsencrypt/live/bear.dating/fullchain.pem;
ssl_certificate_key /etc/letsencrypt/live/bear.dating/privkey.pem;
ssl_protocols TLSv1 TLSv1.1 TLSv1.2;
ssl_prefer_server_ciphers on;
ssl_ciphers EECDH+CHACHA20:EECDH+AES128:RSA+AES128:EECDH+AES256:RSA+AES256:EECDH+3DES:RSA+3DES:!MD5;
ssl_session_cache shared:SSL:5m;
ssl_session_timeout 1h;
add_header Strict-Transport-Security “max-age=15768000” always;
}
#
All we’re doing here is essentially redirecting all traffic from port 80 (HTTP) to port 443 (HTTPS). Then we’re setting it up so the eventual Node server on port 3000 becomes the final destination. We’re also using HTTP2 which you can learn more about here.
And to reload the new config file:
sudo nginx -s reload
But we don’t have our Node server setup yet on port 3000, so let’s do that. First we’ll setup the directory we’ll put the app in:
mkdir /home/ubuntu/app
cd /home/ubuntu/app
Then git clone this repo I created for a simple Node and Express server:
git clone https://github.com/didrio/simple-node-express-server.git .
Now to get Node and npm installed, we’ll install Node Version Manager first:
curl -o- https://raw.githubusercontent.com/creationix/nvm/v0.32.0/install.sh | bash
. ~/.nvm/nvm.sh
And we’ll install the latest version of Node as of this tutorial:
nvm install 8.4.0
Now we can:
npm install
Then:
node app.js
And now our Node server with HTTPS should be running!

Now in Terminal, press “control + C” to stop Node. Let’s install a package that will run our server, well, forever:
npm install forever -g
The “-g” flag will install this package globally on the server, which we need for this package. Then run:
forever start app.js
My portfolio site, which includes this tutorial and will have more tutorials in the future, can be visited here: http://didr.io/
