AWS CloudWatch allows you to collect log from your AWS EC2 instances. Files such as the Apache2 access and error logs that are commonly found on web servers. Or any log file. This is especially useful if you have a scaling group of instances behind a load balancer. Rather than connecting to each instance and manually searching the logs with grep, CloudWatch centralises the logs into one log stream, allowing you to search all your log files from one place.
For example, we have a few EC2 instances behind a Load Balancer to run our main platform API. They all run Apache2 so we send the contents of the Apache2 error log to CloudWatch. Even with just a few servers it’s much easier than logging into each one individually and searching each file with grep commands. Our User Journey infrastructure has over 50 servers and would be practically impossible to manage through the command line alone. If an issue occurs we’re able to see all the logs in the AWS Console without wasting time logging onto everything.
To get CloudWatch set-up on Ubuntu, you need to complete the following:
- Create a new IAM role (one time only)
- Attach the IAM role to an EC2 instance
- Install and configure the CloudWatch agent
Create a New IAM Role
To allow an EC2 instance to communicate with CloudWatch, you first need to create an IAM Role. You only need to do this once, so you can skip this step after it’s been created.
- Open the IAM console. From the menu, select Roles and then click the Create role button.
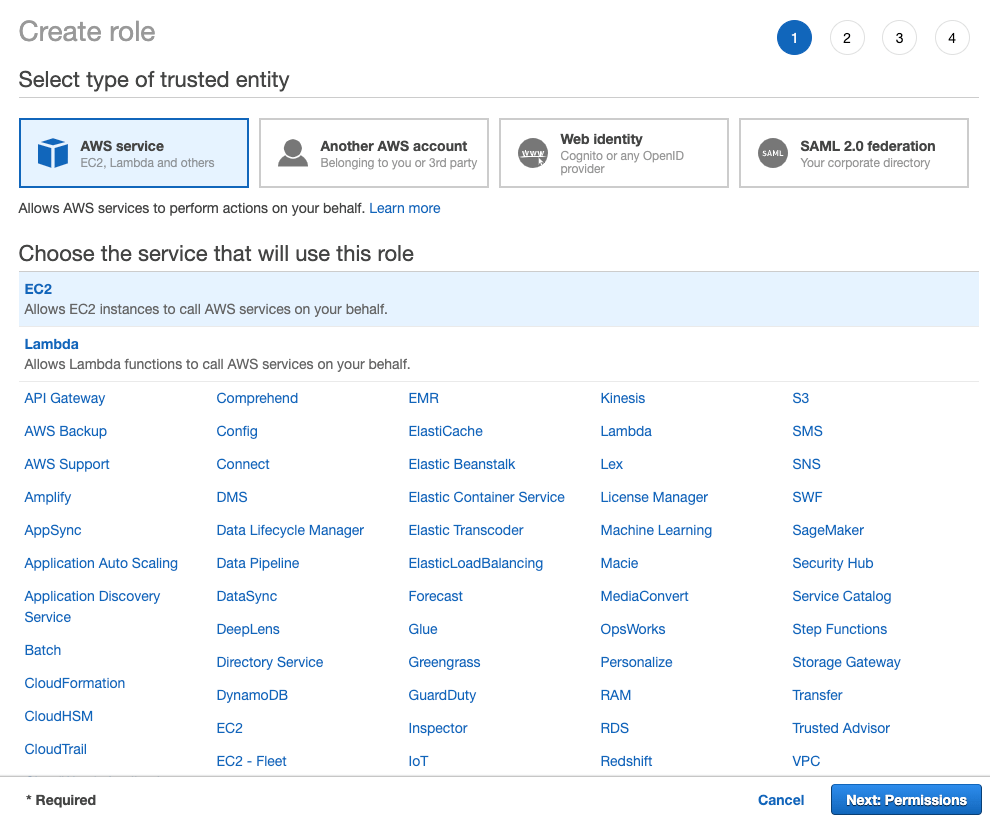
- Under Choose the service that will use this role, select EC2 and click the Next: Permissions button:

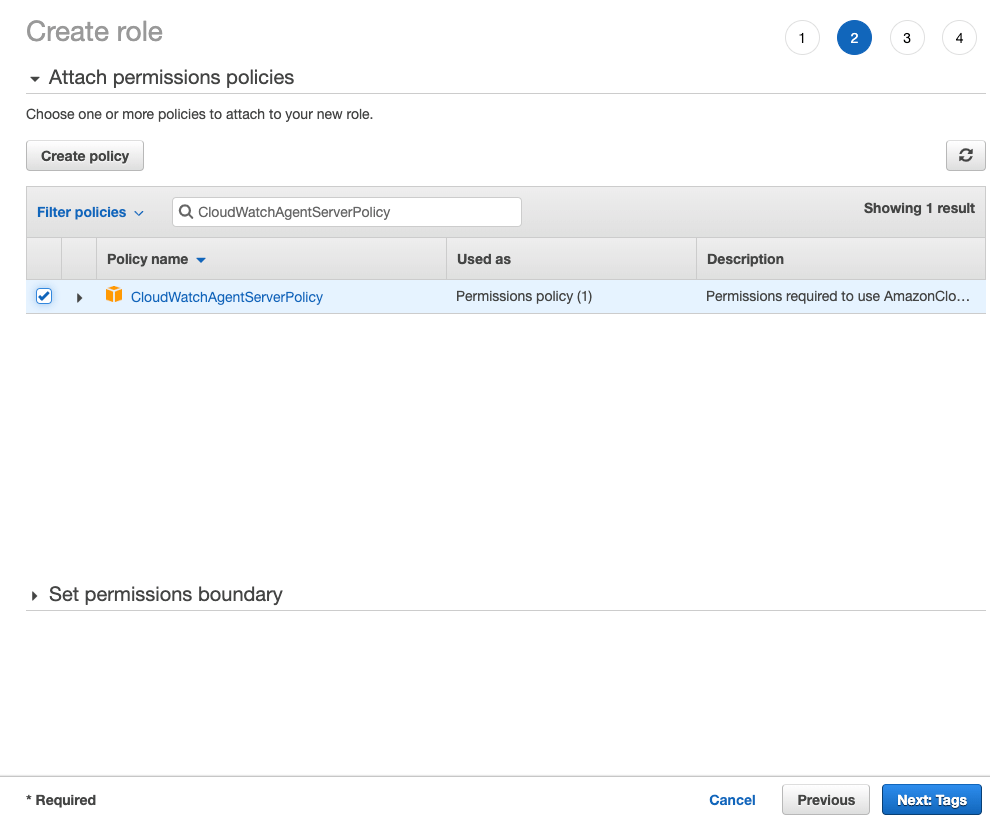
- Search for the CloudWatchAgentServerPolicy policy, check the checkbox and click Next: Tags:

- Add tags if required (I left them blank). Click Next: Review.
- Enter a Role name (e.g. CloudWatchAgentServerRole). Then click Create role.
Attach the IAM Role
To attach the IAM Role to the EC2 instance, you can either do it through the AWS console or via the AWS Command Line Interface (CLI):
1. Using the AWS Console
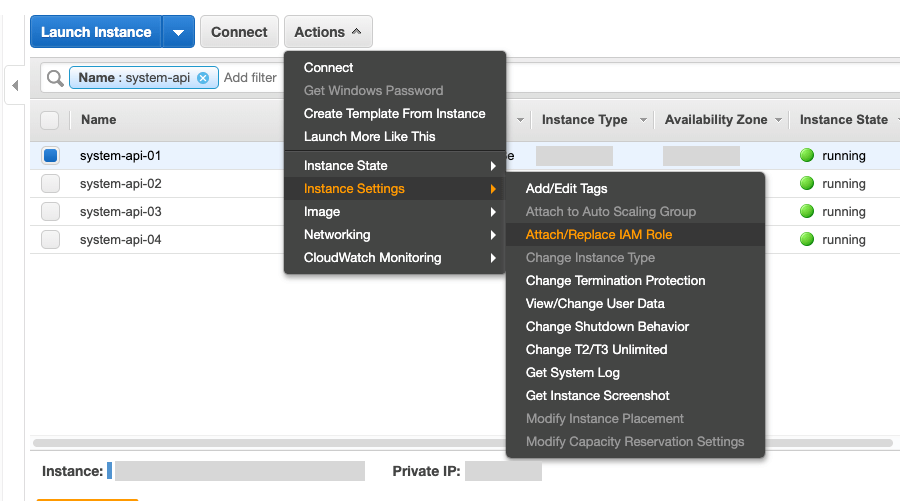
Go to the EC2 Dashboard, select Instances from the menu and check the checkbox next to the EC2 instance you want to stream the logs from. To attach the IAM Role, click the Actions dropdown and select Instance Settings > Attach/Replace IAM Role:
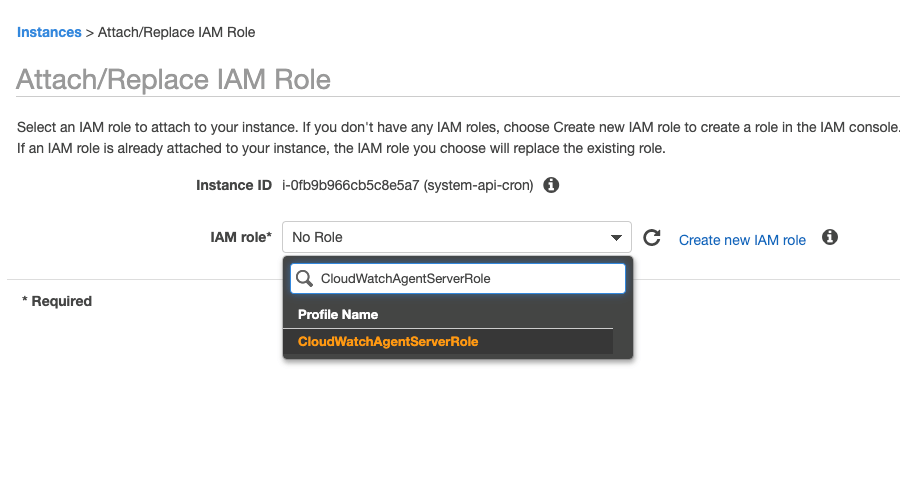
Search for and select the IAM role created above (e.g. CloudWatchAgentServerRole), then click Apply to attach the IAM role:
2. Using the AWS CLI
This command was added to the AWS CLI in version 1.11.46, so make sure you have the correct version (you can check the version with aws --version).
|
1 |
$ aws ec2 associate-iam-instance-profile --instance-id <strong>YourInstanceId</strong> --iam-instance-profile Name=CloudWatchAgentServerRole |
Install CloudWatch Agent
Now everything is in place, connect to the EC2 instance you want to log data from and run through the following few commands. The first is to download the CloudWatch Agent from S3 (the following is for AMD64 Ubuntu, if you want a download for Centos, Debian, etc, see a full list here):
|
1 |
$ wget https://s3.amazonaws.com/amazoncloudwatch-agent/ubuntu/amd64/latest/amazon-cloudwatch-agent.deb |
Install the Agent with:
|
1 |
$ sudo dpkg -i -E ./amazon-cloudwatch-agent.deb |
Now it’s installed it needs to be configured before it can be started. There are two ways to do this, using the wizard which will ask you a series of questions and generate a config file for you, or you can manually add a config file. As we’re only interested in logging one file to CloudWatch and it’s the same on each EC2 instance, it’s easy to manually add a config file:
1. Manually create config.json
The Log Agent uses a config file located at /opt/aws/amazon-cloudwatch-agent/bin/config.json. Use your favourite editor (e.g. vim) to create and edit a file with the following content, e.g.
|
1 |
sudo vim /opt/aws/amazon-cloudwatch-agent/bin/config.json |
|
1 2 3 4 5 6 7 8 9 10 11 12 13 14 15 16 17 18 |
{ "agent": { "run_as_user": "root" }, "logs": { "logs_collected": { "files": { "collect_list": [ { "file_path": "/var/log/apache2/error.log", "log_group_name": "apache-error-log", "log_stream_name": "{instance_id}" } ] } } } } |
The most important part of the config file is file_path. This is the path to the log file on the server that you want to collect data from. /var/log/apache2/error.log is the default error log for Apache on Ubuntu. The log_group_name and log_stream_name options are just used for naming the Log Group and Log Streams respectively in CloudWatch. I’d recommend keeping {instance_id} for the log_stream_name as this helps identify which EC2 instance sent the log data.
2. Wizard
To start the wizard run:
$ sudo /opt/aws/amazon-cloudwatch-agent/bin/amazon-cloudwatch-agent-config-wizard
You’ll be asked a series of questions. The Log Agent can be used to collect system-level metrics, so you will be asked about them. But you can ignore those questions as they’re not related to collecting logs. If you do use the wizard, you can always take the config file that’s generated and then manually add that (following the step above) to any additional instances.
Start the Agent
Run the following command to run the agent. The CloudWatch agent is integrated with systemd so it will start automatically after a reboot:
|
1 |
$ sudo /opt/aws/amazon-cloudwatch-agent/bin/amazon-cloudwatch-agent-ctl -a fetch-config -m ec2 -c file:/opt/aws/amazon-cloudwatch-agent/bin/config.json -s |
View Logs
Once the log file you are watching has data written to it, you’ll be able to find it in CloudWatch. Go to the CloudWatch Overview and select Logs from the menu. You should see the label for the Log Group you used in the config (e.g. apache-error-log).
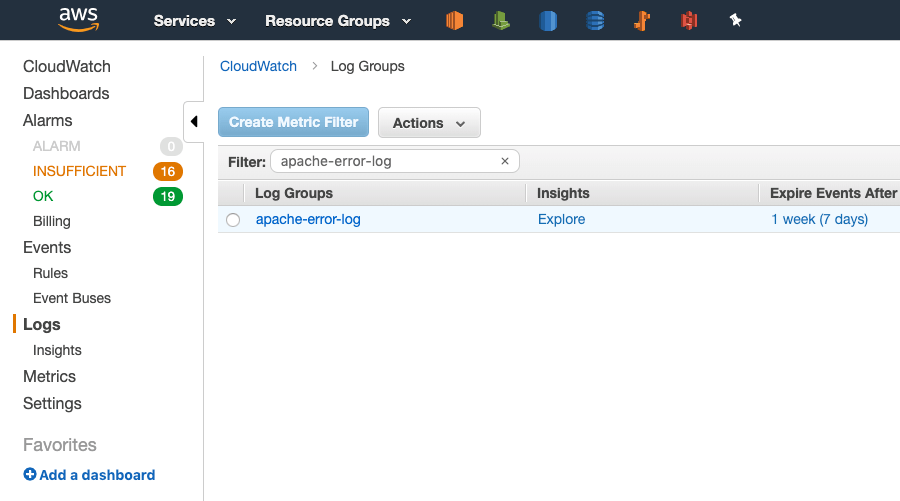
Click on the log group name to see the log streams. Each log stream uses the EC2 instance ID, so you know which EC2 instance logged the data:

To search the logs, click the Search Log Group button. In the filter text box, enter a search term to search all your log files in one go:


