You can register a new domain directly in Amazon Route 53, but unfortunately, not all top-level domains (TLDs) are supported. You can view the list of TLDs that are currently supported by Route 53 here, but a couple of notable exceptions that developers might run into are .app and .dev .
Fortunately, Google Domains allows you to register both of these domains, and while you cannot transfer domains to Route 53 if the TLD is not supported, you can still manage it there.
Note: In this guide, I’ve used the domain myreallycoolsite.app purely as an example— I do not own this domain, and in fact, if you really like it, it appears to be available at the time of writing.
Why Manage Your Domain in Route 53?
You might be wondering what the advantages are of managing your domain in Route 53 — especially because Route 53 is not a free service in AWS. Here are some reasonings for migrating to Route 53:
Consolidation
If the rest of your architecture is already in AWS — then this keeps you from having to switch out of AWS to manage this one thing.
Additionally, if you are using Infrastructure as Code (IaC) such as CloudFormation or AWS CDK, you are able to define your Hosted Zones as code instead of configuring them manually. However, if you’re not heavily tied into other AWS services, this may not matter to you.
Convenience
I’ve previously written about How to Route an AWS Amplify App to a Google Domain, but the manual steps that I describe in this article aren’t required if your domain is already in Route 53 — AWS ACM Certificates can be automatically verified.
You can also build Alias (A) records in Route 53 that will let you directly alias other resources in AWS, such as CloudFront, Load Balancers, etc.
Routing Features
Google Domains is great for registering a domain quickly, but if you want or need to get into advanced routing policies, Route 53 offers many different types of routing.
Step 1: Add a New Hosted Zone in Amazon Route 53
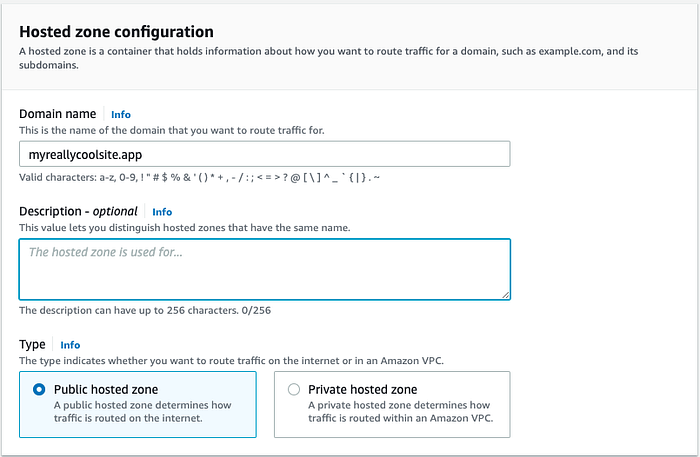
First, you’ll need to create a new Hosted Zone in Route 53.
You can do this by clicking “Create Hosted Zone” and entering your domain name and an optional description. The type should be “Public Hosted Zone”. Once you’re done filling in the details, you can click the button to create the Hosted Zone.
If you are using IaC, you do not have to do this step through the console, and should instead refer to the HostedZone CloudFormation or CDK construct.

Please note that Hosted Zones within AWS are not free, they start at $0.50/month.
Step 2: Retrieve your Name Server Records
Now that I’ve created my Hosted Zone, Route 53 has automatically created two records, an NS (Name Server) record and an SOA (Start of Authority) record. At this point, we’re interested in the four values in the NS record.

Step 3: Update Google Domains
In Google Domains, first navigate to your domain, and then to “DNS” on the lefthand menu. At the top, be sure to select “Custom Name Servers”. Enter the 4 servers in the NS record in Route 53 and click “Save”.

Step 4: Activate the Setting to use Custom Name Servers
Depending on how your Settings are configured in Google Domains, it’s possible that the Name Servers you just configured are not in use.

In this case, clicking the “Switch to these settings” will quickly and easily remedy the problem. However, please note that if you have any special DNS records configured in Google Domains, they will cease to function unless you migrate them over to Route 53.

Please note that it will take some time for these DNS changes to propagate. It can take as long as 48 hours, but it is usually much quicker!
